CHANGE GITLAB RUNNER

Required Details :
- server architectures type [ x86, AMD64, ARM64, ARM, s390x, ppc64le
]
- super user access [ sudo password ]
SSH in server where you want to set git runner.
Step 1)
#download binary for your system

Warning : Select binary as per instance architecture type. in this case instance type is AMD-64

Other architecture binary - https://docs.gitlab.com/runner/install/linux-manually.html
sudo curl -L --output /usr/local/bin/gitlab-runner https://gitlab-runner-downloads.s3.amazonaws.com/latest/binaries/gitlab-runner-linux-amd64

Step 2)
#chmod permission
sudo chmod +x /usr/local/bin/gitlab-runner
Step 3)
#add git CI user
sudo useradd --comment 'GitLab Runner' --create-home gitlab-runner --shell /bin/bash
Step 4)
#install run service
sudo gitlab-runner install --user=gitlab-runner --working-directory=/home/gitlab-runner
Step 5)
#start gitlab runner
sudo gitlab-runner start
Step 6)
#register git instance
sudo gitlab-runner register
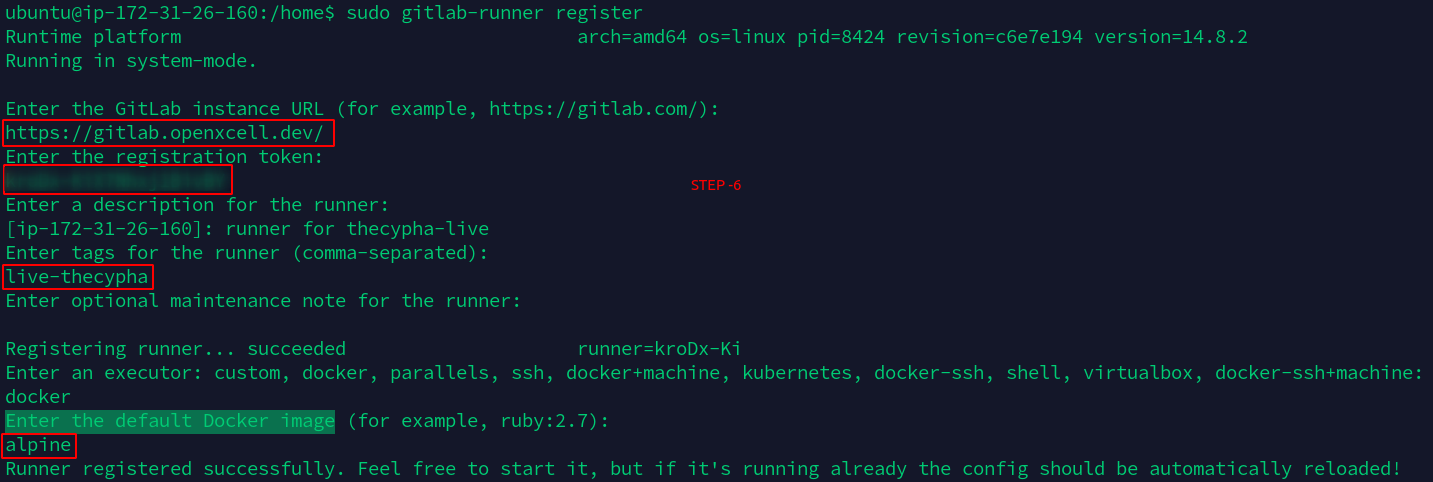

Notes :
- Enter the GitLab instance URL (for example, https://gitlab.com/): ->>
https://gitlab.openxcell.dev/- Enter the registration token: ->> [ get token in Settings -> CI CD -> Runners -> this registration token:
] ( group-wise & repository wise possible )
- Enter a description for the runner: ->> write ( description )
- Enter tags for the runner (comma-separated) : phase-project name ( phase value are = development or live or stage )
- Enter optional maintenance note for the runner: ( press Enter & ignore )
- Enter the default Docker image : ( as per requirement )
Step 7)
after successfully performing all steps you can see CI CD runners.
Step 8)
- You need to check tags are same as Runners.
- You need to check tags are same as Runners.
Related Articles
gitlab clone in mac OS
-Need to generate ssh key using -> ssh-keygen save it to the specific directory || add key to the gitlab ssh key section from the .pub file -> -nano ~/.ssh/config add this data Host * AddKeysToAgent yes UseKeyCHain yes IdentityFile ...Registering to OpenXcell SSO
Overview: Openxcell SSO, is an enterprise grade Identity Provider supporting Single-Sign-On Using various authentication protocols such as OIDC and SAML. To ensure single point of authentication and security across all the organization owned and ...How: Change Upload File Limit in Docker Project
Github > Common-Components >Select Particular branch > orderhive-plus > templates > frontend.yaml add line : nginx.ingress.kubernetes.io/proxy-body-size: "25m" in annotations SectionAWS Services
AWS also provides many other functionalities other than server like domain hosting, Email sending, Monitoring, Alerting, AI For a website, we can use the following basic AWS services 1. EC2- Elastic Compute Cloud It consists of Compute and ...What & How : CI/CD Tools
After your project has been successfully automated... 1. Jenkins - You will be provided with a Jenkins URL: jenkins.openxcell.info:8080 - You need to login to this. - You will be given credentials by DevOps Team - If you didn't get your ...